Learning how to use G SUITE to Create a Professional Email Address
Following the creation of a website, every business owner requires a professional email address that includes their company name.
When interacting with other businesses and customers, having a professional email address will help you gain trust.
G Suite is a Google productivity suite that lets you utilize Gmail with your own business email address. In this article, we’ll show you how to use Gmail and G Suite to create a professional custom branded email address.

What is the definition of a professional email address?
A professional email address is one that includes your company name. A professional email address, for example, is john@myphotostudio.com.
Free email accounts, such as john.photographer@gmail.com, are not suitable for business since they lack professionalism. A professional email address will be more trustworthy to your consumers and other businesses.
A domain name and a website are required for a professional email account. We provide step-by-step instructions on how to pick a domain name and create a website quickly.
You can have your own professional email address if you already have a domain name and a website.
Why Should You Use G Suite for a Professional Email Address?
Why use G Suite when the majority of WordPress hosting companies provide limitless email accounts with your own domain name?
For business owners, email is one of the most vital communication tools. It can be detrimental to your business if you miss an essential email.
Most email servers used by web hosting companies are unreliable, limited, isolated, and insecure. You’d have no way of knowing if the email you sent was received.
G Suite and Gmail are useful in this situation.
With 1.5 billion monthly active users, Gmail is the industry leader in email. G Suite is Google’s commercial productivity app suite, which includes Gmail, and is used by over 4 million organizations and 80 million students and educators.
G Suite integrates with your own domain name, allowing you to build a professional branded email address using Gmail.
Some of the advantages of using G Suite and Gmail for a professional email account are as follows:
- With your own domain, you can have a professional business email address.
- Gmail’s spam and security filters are second to none.
- 30 GB – This is twice as much storage as a free Gmail account.
- Using the Gmail app on mobile devices, you can manage your email even when you’re not connected to the internet.
- It works on any device: online, mobile, tablet, and so on.
- It syncs previous Outlook accounts and works well with Outlook.
- Each user has the ability to create up to 30 email aliases.
- On your own business email account, use Google Calendar and Google Hangouts for chat, video, and audio conversations.
- There are no advertising, and professional assistance is available 24 hours a day, 7 days a week.
- This plugin integrates smoothly with your WordPress site.
- Most importantly, great deliverability, no delays, and no spam folder entries.
Let’s look at how to set up a branded professional email account with G Suite now that you know why it’s crucial to use G Suite for professional emails.
Note from the editor: We use G Suite for all of our professional email addresses and can honestly claim it’s the finest.
Using Gmail to Create a Professional Email Address (G Suite)
You’ll need to create a G Suite account first.
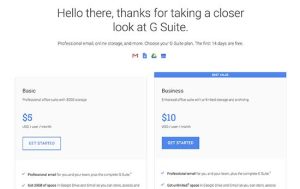
Each user pays about $5 per month. If you pay for the year in advance, you’ll get two months free ($50 per user).
G Suite also offers a 14-day free trial, allowing you to try everything out before making a decision. Basically, it has all of the great features you’re used to from Gmail, Drive, Calendar, and other Google products (but it’s now for your business).
Simply go to the G Suite website and select the desired plan by clicking the Get Started button.
After that, you must provide your company’s name, the number of employees, and the country in which you operate. You have the option of creating a single user account for yourself or a group of employees.
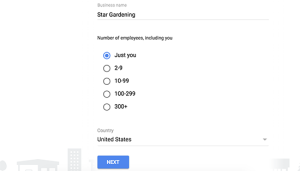
To continue, click the next button.
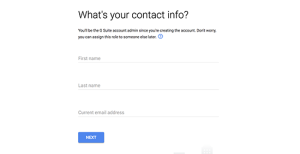
You’ll be asked to input your personal contact information, such as your name and email address, in the next step.
Following that, you’ll be asked to select a domain name. If you already have a domain name, select ‘Yes, I already have one that I can use.’ Otherwise, select ‘No, I require one’ to obtain a domain name.
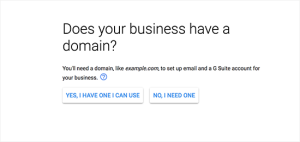
You will be charged individually if you need to register a new domain name (tip: here’s how to register a domain name for free).
If you’re going to use an existing domain name, you’ll need to double-check who owns it. Later in this essay, we’ll teach you how to do it.
You’ll be prompted to establish a G Suite user account by entering a username and password in the next step.
This username will also serve as your first professional email address, so make sure it’s one you want to use.
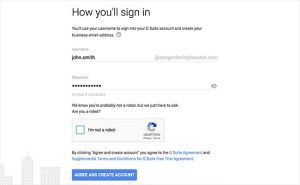
Your G Suite account has been successfully created. You may now select ‘Go to Setup’ from the drop-down menu.

You’ll be asked to add extra users to your account on the setup screen. You can use this page to establish additional accounts for your employees or departments.
You can alternatively select ‘I have inserted all user email addresses’ and go to the next step by clicking the next button.
Keep in mind that you may always add more users to your account and generate their email addresses later if necessary.
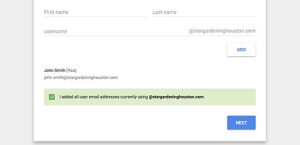
If you registered your domain name somewhere else, you’ll be asked to authenticate your ownership of it now.
After that, you’ll see a piece of HTML code that you’ll need to paste into your website.
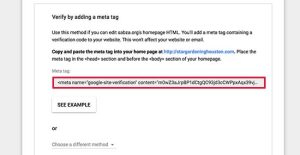
There are other additional ways to confirm your website’s ownership. Using an FTP client or the file management program in your hosting account dashboard, you can upload an HTML file to your website.
You can also utilize the MX Record approach if you don’t have a website. If you pick this approach, you will be given step-by-step instructions on how to do so.
We’ll assume you already have a WordPress blog for the purposes of this article, and we’ll teach you how to add the verification HTML code snippet in WordPress.
Install and activate the Insert Headers and Footers plugin in a new browser tab by going to the WordPress admin area. See our step-by-step guide on installing a WordPress plugin for more information.
Go to Settings » Insert Headers and Footers and paste the HTML code you copied from G Suite beneath the ‘Scripts in Header’ section after activation.
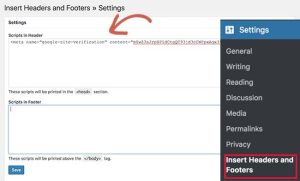
Don’t forget to save your changes by clicking the ‘Save’ button.
Return to your G Suite configuration screen and choose the checkbox next to ‘I applied the meta tag to my homepage.’
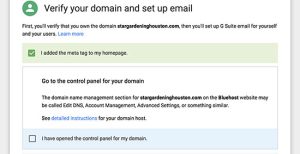
After that, you’ll be prompted to enter MX records for your domain name.
Note: If you already have a domain name and a website, you only need to add MX records. MX records are not required for those who registered their domain names using Google.
Your emails will reach your domain name, but not the Google servers, because your domain name is not registered with Google.
To allow Google’s servers to send and receive emails for your company, you’ll need to configure the appropriate MX records in your domain name settings.
To do so, go to your web hosting account or your domain registrar’s account and log in.
We’ll show you how to add MX records in Bluehost, but the premise is the same across the board for all hosts and domain registrars. Basically, you’ll be looking under your domain name for DNS settings.
Click on ‘Domains’ from your Bluehost hosting dashboard. Select your domain name on the next page, then click the ‘Manage’ link next to the DNS Zone Editor option.
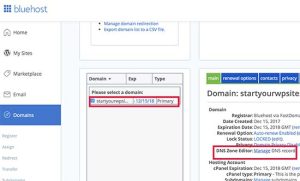
Your DNS zone editor will now be opened by Bluehost. Return to your G Suite setup screen and check the box labeled “I have opened the control panel of my domain name.”
It will now display the MX records that must be entered. You’ll also find a link to documentation that explains how to add these records to dozens of different hosting and domain service providers.
To add this information to your Bluehost DNS settings, follow these steps:
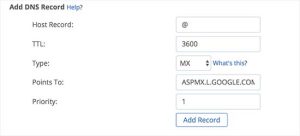
To save it, click the ‘Add Record’ button. After that, repeat the process to add MX records to all five lines.
Switch back to G Suite setup and click the box next to ‘I produced the new MX records’ once you’re done.
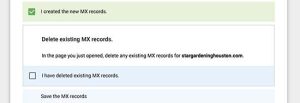
Any current MX records pointing to your website hosting or domain name registrar will be asked to be deleted.
Return to your DNS zone editor and scroll down to the MX records section to accomplish this. You’ll see the MX records you set up previously, as well as an older MX record that still points to your website.
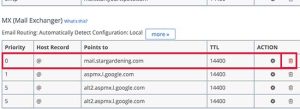
To delete an old MX record, click the delete button next to it.
Return to the G Suite setup screen and select the option that says “I destroyed existing MX records.”
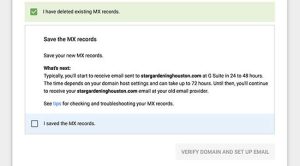
You’ll be prompted to store your MX records at this point. For some providers, MX records are automatically stored after you add them; for others, you may need to manually save MX information.
Check the box in G Suite setup that says “I have saved MX records” once you’ve saved MX records.
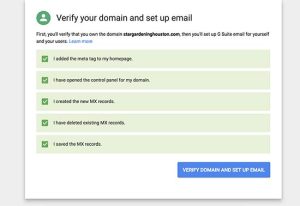
After that, to exit the setup wizard, click the ‘Verify domain and configure email’ option.
Using G Suite and Gmail for Professional Email
Your email account functions in the same way as any other Gmail account. You can sign up for it by going to the Gmail website and entering your email address, such as john@yourdomain.com.
You can also use the admin console to manage your G Suite account.
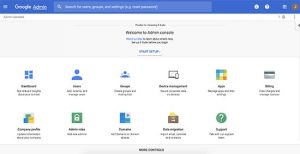
You can add/remove new users from your domain name here. Your users will each have 30 GB of storage and access to all of the same features as you, but they will not have access to the admin console. You have the option to remove those users at any moment.
G Suite Domain Setup Troubleshooting
Your web server is unlikely to use a dashboard like the ones seen in the screenshots above.
Many of the popular web hosting and domain registration service providers include thorough documentation in G Suite. Set up MX records (special steps for hosts) and then find your domain registrar or web host in the list.
If your service provider isn’t listed, you can contact them directly and ask them to assist you with setting up G Suite for your domain name.
We hope that setting up a professional email address with G Suite and Gmail was as simple as this guide made it. You might also be interested in our collection of 19+ free Google tools that every WordPress blogger should know about.


