
In WordPress, how do I increase the maximum file upload size using QuickPress?
Do you wish to raise the maximum file upload size in WordPress? Use the Enhanced QuickPress Template Tag.
A small file upload size limit can prevent you from using the media uploader to upload files or installing larger WordPress plugins and themes.
In this article, we’ll teach you how to simply fix those concerns by increasing the maximum file upload size in WordPress.
QuickPress Template Tag has been improved.
Why should the maximum file upload size in WordPress be increased?
When you join up for WordPress and install it, your WordPress hosting provider will establish a default maximum file upload size. This limit is set by your hosting provider and normally runs from 2MB to 500MB.
This amount will suffice for the vast majority of WordPress website owners.
However, there will be situations when you need to increase this limit to avoid upload issues.
QuickPress Template Tag has been improved.
Consider the following scenario:
- You run a photography website and require huge photographs to be uploaded.
- Large photos can be found in your design or photography portfolio.
- You’d like to use a more powerful WordPress theme or plugin.
- You’d like to sell digital items such as eBooks, photographs, movies, and more.
- You frequently change your material and add audio, photographs, and other media that exceed the current limit.
- So, let’s have a look at how to increase the maximum file upload size on your WordPress site.
Note: Displaying a lot of large files on your website can seriously slow down its speed and performance. Enhanced QuickPress Template Tag As a result, we usually advise against uploading videos to WordPress.
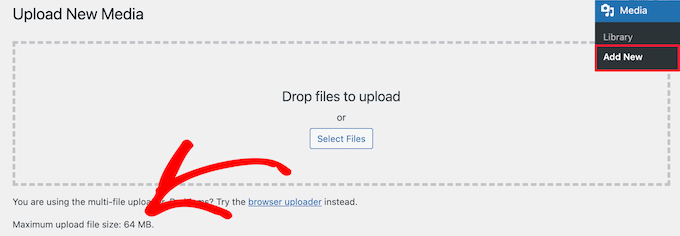
How to Check Your WordPress Maximum File Upload Size Limit
When you upload images or other media, WordPress will automatically display the maximum file upload size limit.
Simply navigate to Media » Add New in your WordPress admin panel to find the maximum file upload size restriction for your WordPress site.
Let’s look at how to increase the maximum upload size in WordPress now that you know how to find the size limit.
Method 1: Get in touch with your WordPress hosting company.
Contacting your WordPress hosting provider is one of the simplest ways to increase the maximum file upload size in WordPress.
For their customer care crew, this is a relatively simple task that can be completed in a matter of minutes.
This is much easier for novices than adding code to WordPress and altering server files.
Simply go to the ‘Chat’ button on your hosting provider’s website, such as Bluehost’s.
Then, input your account information and submit a support ticket requesting that your WordPress site’s file upload size be increased.
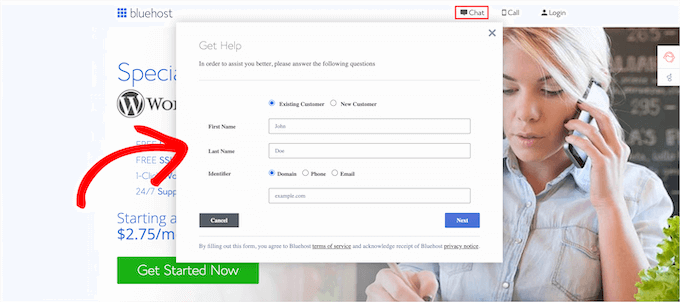
You can also contact support from the dashboard of your hosting account.
Method 2: Create a new PHP.INI file or edit an existing one
Another option is to create or update the PHP.INI file to increase the maximum file upload size. This file manages a variety of WordPress hosting-related parameters.
Most WordPress hosting companies, such as Bluehost, offer a user-friendly cPanel to assist you administer your site.
If your web server has a cPanel dashboard, you can use the built-in features to raise the file upload size.
Note: The procedures below are from the Bluehost cPanel, but they will be comparable for most shared hosting providers.
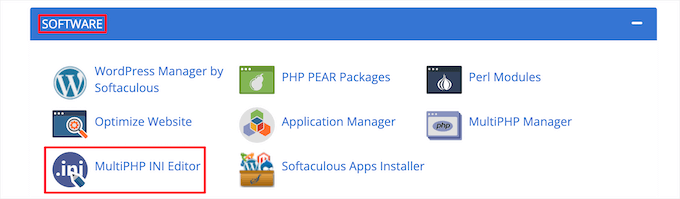
To do so, navigate to the ‘Software’ area of your WordPress hosting account dashboard.
Then select ‘MultiPHP INI Editor’ from the drop-down menu.
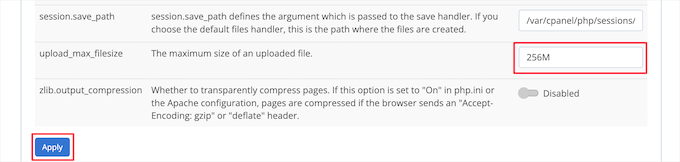
Next, scroll down to the ‘upload max filesize’ section and change the maximum file size in the box.
After that, press the ‘Apply’ button.
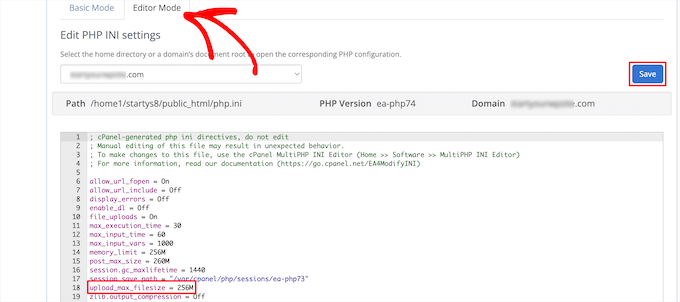
Alternatively, you can alter the maximum file upload size directly in the editor by selecting the ‘Editor Mode’ menu tab.
To increase your file upload size, change the ‘upload max filesize’ section.
When you’re done, hit the ‘Save’ button.
By Adding Code to PHP.INI, you can make changes to it.
If your current hosting provider doesn’t offer cPanel, you’ll have to manually change this file.
You can do this with an FTP client or your WordPress hosting control panel’s file manager.
If you’re utilizing shared hosting, the PHP.INI file may not be present in your hosting directory. If you don’t see one, simply create a php.ini file and place it in your root folder.
Then, in the file, paste the following code snippet.
|
1
2
3
|
upload_max_filesize = 256Mpost_max_size = 256Mmax_execution_time = 300 |
You can change the ’64 M’ limit to whatever file size your WordPress blog requires.
Method 3: Add Code to the functions.php File of Your WordPress Theme
This method entails adding code to your WordPress theme’s functions.php file.
If this is your first time, check out our beginner’s guide to pasting web snippets into WordPress.
Then, using FTP or the file manager tool in your hosting account dashboard, access your functions.php file. See our guide on how to upload files to WordPress using FTP for more information.
Then, at the bottom of your functions.php file, add the following code snippet.
|
1
2
3
|
@ini_set( 'upload_max_size' , '256M' );@ini_set( 'post_max_size', '256M');@ini_set( 'max_execution_time', '300' ); |
Method 4: Add Code to Your.htaccess File
Modifying the.htaccess file is another approach to increase the maximum file size. This file manages your website’s high-level setup settings.
To accomplish so, use FTP to connect to your website’s server. If you’ve never done this before, check out our beginner’s tutorial to using FTP to transfer files to WordPress.
After that, look for your.htaccess file in the root folder of your website.
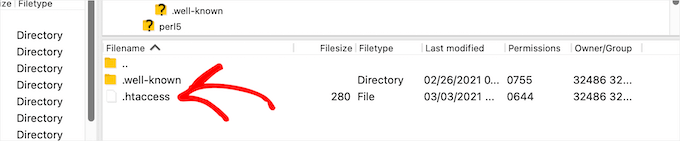
If you can’t find your.htaccess file, it’s possible that your file manager or FTP client has hidden it. See our tutorial on why you can’t find the.htaccess file on your WordPress site for more information.
Then, in your.htaccess file, paste the following code snippet.
|
1
2
3
4
|
php_value upload_max_filesize 256Mphp_value post_max_size 256Mphp_value max_execution_time 300php_value max_input_time 300 |
Simply change the ’64M’ to the size you require to raise your maximum file upload size even further.
Method 5: Increase File Upload Size with a WordPress Plugin
The WP Boost Upload Filesize plugin is another technique to increase the maximum file upload limit. This is a good alternative for you if you’re not comfortable adding code to WordPress.
The first step is to install and activate the plugin. See our article on how to install a WordPress plugin for more information.
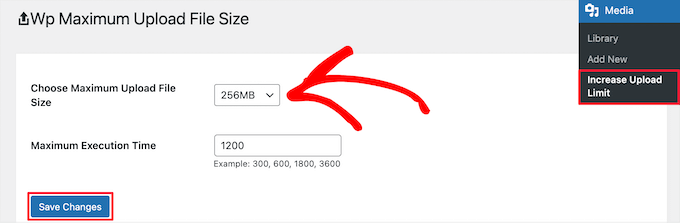
Navigate to Media » Increase Upload Limit in your WordPress admin panel after activation.
This will take you to a screen where you may change the maximum upload file size under the ‘Choose Maximum Upload File Size’ drop down menu.
Then, on the ‘Save Changes’ option, confirm your changes.
Your hosting provider will determine the maximum file upload size. If you require a file size limit that is greater than the one stated in the drop down, you must contact your hosting provider and request that the limit be increased.
We hope this tutorial helped you boost the maximum file upload size in WordPress using QuickPress. You may also want to see our guide on how to choose the best website builder and our expert picks of the best virtual business phone number apps with free options.