
The first step is to download and install the plugin.
To get the plugin, go to SlideDeck’s website and download it. They provide a free version as well as a PRO edition with more features and support. We always receive the support version whenever we work with a new product. We were stranded a couple of times during our development, and their support was fantastic in getting us unstuck. Vertical Slides, Touch Screen Support, Support, RSS Feed Smart SlideDecks, Background Image Support, and many more are just a few of the interesting features included in the PRO version.
After you’ve downloaded the plugin, you’ll need to install and activate it. (To install a WordPress plugin, follow our step-by-step guide.)
Let’s make a slider together.
After you’ve activated the plugin, you’ll notice a new tab called SlideDeck appear. Let’s go on to the next step and select Add New SlideDeck. You’ll be taken to a screen similar to the Post Write Panel.
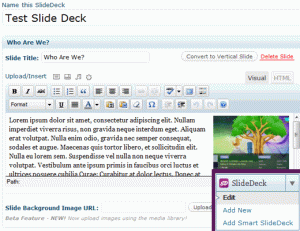
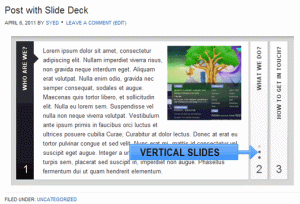
So we filled in the blanks in our presentation with content and gave it a title. We could have used a custom background image (PRO Feature), but we chose not to do so for the sake of simplicity. We’d like to demonstrate what this plugin can achieve right out of the box. Our first standard slide was this. The following slide in our demonstration was a vertical slide (PRO Feature). Multiple slides within a slide are known as vertical slides. A button labeled Convert to Vertical Slide may be found in the image above. For our next slide, we clicked the button, and the following was added:

Rep the procedure as needed for as many slides as you desire. Let’s look at the SlideDeck Options for publishing the slides on your site once you’ve finished producing them. This can be found on the right side of your Edit slides screen.
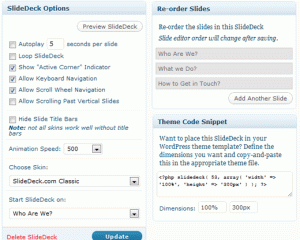
You may set it to auto-play, allow keyboard navigation, allow mouse scroll-wheel navigation, control animation speed, choose one of their beautiful skins, and choose which slide to begin with. You can also drag and drop the slides to reorder them. As you can see, there’s a theme code snippet with the code you should use in your theme. It can be placed anywhere in your theme. Oh, wait, didn’t we say you wouldn’t have to change a single line of code to get SlideDeck to work with WordPress? Yes, throughout this tutorial, we shall stick to our words. Let us teach you how to add it to your WordPress site without changing a single line of code.
Using SlideDeck in WordPress Posts and Pages
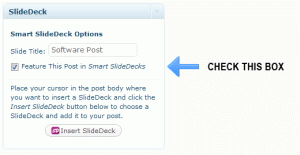
Make a new page or post. In the right-hand sidebar, you’ll notice a new SlideDeck box.
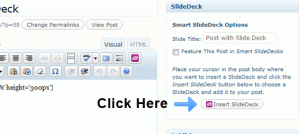
Insert SlideDeck by pressing the Insert SlideDeck button. Choose the Slider you wish to use, then publish the post. With the Classic Skin, your slider will look like this once you publish the post:
It can be used on a sticky post, a full-width page template, or anywhere else. But hold on, there’s more. Let’s take things a step further.
Add a Featured Posts Slider to your website.
Bloggers’ favorite feature post sliders are featured post sliders. We see this feature on a lot of blogs, but most of the time, the sliders are hard coded into the themes, giving consumers very little control. So, let’s have a look at how simple it is with SlideDeck. You may add a dynamic slider called “Smart SlideDeck” that allows you to show your most recent posts, most popular posts, featured posts (the ones you choose), sort by category, and even integrate RSS Feeds from another site. You may choose from a variety of skins, several types of navigations, and have a slider up and running in less than 5 minutes.
Let us demonstrate how. Featured entries from our Posts will be displayed in our lesson.
Select 5 posts from your current posts and tick the box to add them to Smart SlideDecks.
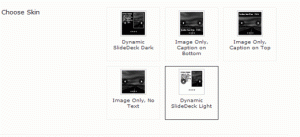
Now, navigate to your SlideDeck Panel and select Add Smart SlideDeck from the drop-down menu. Select Your Skin Tone:
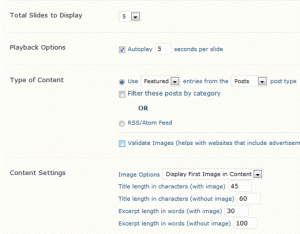
Choose the number of slides to show, the playback settings, and the content type (See how we have it as Featured entries from the Post). You can customize the Content Settings, such as picture options, title length, and excerpt length, among other things. Click Publish after selecting your Navigation Styles.
On this one, you’ll need to make some changes to the code. Copy the code from the Theme Snippet Code section of the Sidebar and paste it into your theme. Probably around the top of your index.php file. The following is an example of code:
|
1
|
<?php if (is_home()) { slidedeck( 73, array( 'width' => '100%', 'height' => '370px' ) ); } ?> |
This will only show your slider on your homepage.
If you want to view some really great SlideDeck demos, go to SlideDeck’s website and look around.