We recently needed to integrate a simple post rating system into our project and encountered a number of plugins. After testing various, we discovered that “WP-PostRatings” by Lester ‘GaMerZ’ Chan is the finest option for adding a post rating system to WordPress. We’ll show you how to set up an AJAX rating system for your WordPress blog posts and pages in this article.
You must first install and activate the WP-PostRatings Plugin
When you activate the plugin, it will add a new menu item called ‘Ratings’ to your WordPress admin bar.
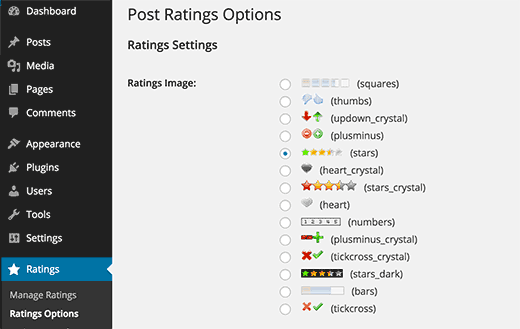
We’ll bypass the “Managed Ratings” option and go straight to the “Rating Options” tab’s second link.

You must first choose which rating image you wish to use for your posts on the plugin’s settings page. Bars, hearts, numbers, plus-minus, the classic stars, thumbs up/down, up-down arrows, and other options are included in the plugin.
After you’ve decided on a rating system, go ahead and click “Max Ratings.” The plugin will choose an acceptable value for you, but if you’re using the bars picture, you might wish to provide your own rating value. Going over 5 stars and numbers seems futile because there are only 5 stars.
If you change the Max Ratings, you’ll also need to change the Individual Rating Text/Value. If you don’t modify the Max Rating value from the default, the Individual ratings will remain the same.
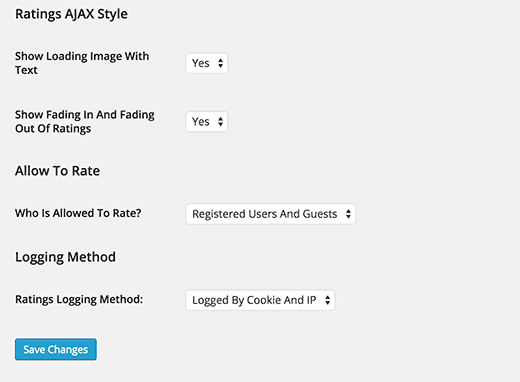
Then you’ll find Ajax Style, Rating Permission, and Logging Method options.

For the greatest effects, follow the styling in the image above. You may need to update them if you wish to personalize.
We’ve completed this page; please save your modifications. Now we’ll go to the “Ratings Templates” page. On this page, you’ll find a variety of rating templates as well as suggestions for how to organize them. We kept them at their default setting, but you are welcome to change them using the Template Variables at the top of the screen. This is merely a demonstration of how your ratings will be presented. You’re ready to incorporate this into your theme once you’ve completed the “Ratings Templates” page.
You will need to add the following lines to the LOOP in the following files (archives.php, page.php, index.php, single.php, loop.php, etc) depending on how your theme is set up — Depending on the structure of your theme, you may not have all of these files.
|
1
|
<?php if(function_exists('the_ratings')) { the_ratings(); } ?> |
It’s worth noting that this will apply the post rating to all of your postings. You can use the shortcode [ratings id=”1″ results=”true”] to display the ratings on just that post or page if you just want to use it on certain posts.
Your users will vote on your content now that you’ve added ratings. You may see those ratings by going to the “Manage Ratings” option, which we initially skipped. This allows you to examine a history of ratings for each post, as well as delete them if you believe something isn’t right.
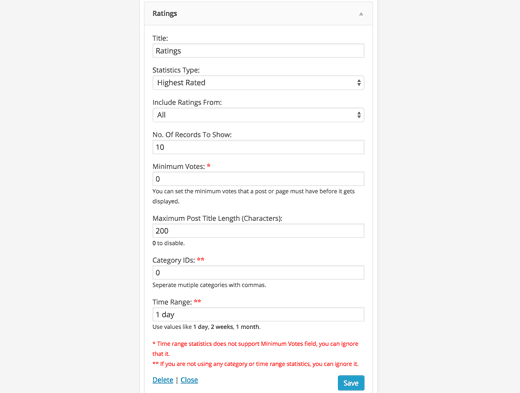
The nicest aspect about this plugin is that it can display the Top Rated Posts (time range and category options), Most Rated Posts (time range and category options), Lowest Rating, and Highest Rating with the same time range and category options. These types of stats are typically displayed in the sidebar, thus this plugin allows you to use Widgets to display them (assuming your theme supports widgets, which most do!). To access the Ratings widget, go to Appearance » Widgets. Drag it to the desired area and customize the settings.

As you can see in the screenshot above, there are a lot of options. The first step is to choose a title for your widget. It’s better to choose something like “Most Popular Posts This Week” or something like. Depending on how the rest of your settings are handled. The Statistic Type field provides a lot of options, such displaying the highest rated, most rated, lowest rated, and highest rated items. You may also sort these statistics by category or by time. The next option asks if you want both your posts and pages to be included. This is completely a matter of personal preference. So take your pick. By default, the widget displays the top ten most popular entires, however this can be modified by altering the No.a number of records to display We strongly advise against making it greater than ten because it will seem strange with most designs. You may also specify the minimum amount of votes a post must receive in order to be included in this list. You may or may not want to change the Maximum Post Title Length depending on your site’s design. If the width of your theme location is sufficient, we recommend setting the value to 0 to disable it. You’ll need to change the last two fields if you’re utilizing the Category or Time specific statistic types. All you have to do now is click and save.
We understand that some of you are code nerds who refuse to use the widget settings. Lester’s site offers a very informative Usage Tab that shows how to integrate the most rated, highest rated, and other metrics right into your WordPress themes. The WP-PostRatings Usage Guide may be found here.


