Do you want to add a Blog Post checklist to the WordPress editor?
A checklist can help you to make your posts the best they can possibly be. If you’ve added multiple authors to your site, then a checklist can also help everyone write in the same style and remember all the details.
In this article, we’ll show you how to add a blog post checklist to the WordPress editor.
Why is it necessary to include a Blog Post checklist in the WordPress editor?
The first step is to write a nice blog article for your WordPress website.
You’ll want to edit, proofread, add categories and tags, optimise the content for search engines, and more once you’ve completed writing.
A checklist might be useful in this situation. Checklists provide a list of activities that must be completed before to publishing your content, such as adding internal links or alt text.
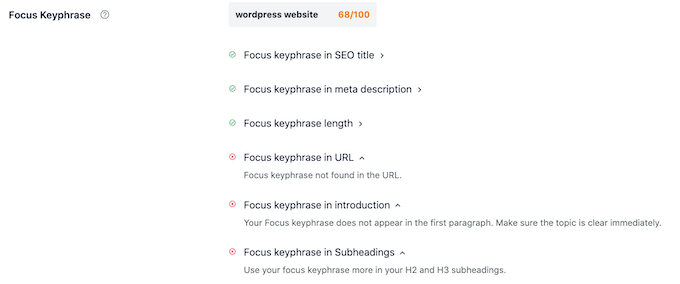
Checklists are used by several WordPress plugins, such as AIOSEO, to assist site owners with search engine optimization.
Checklists are often used to keep track of your article as you write it and then check off each job as you complete it. This makes it simple to assess what you’ve accomplished so far and where you still need to improve.
But what if you wanted to use WordPress to construct your own unique checklist?
Perhaps you have a multi-author blog and want to verify that your work meets a specific standard of quality. Checklists are extremely useful in this situation.
Let’s look at how to add a blog post checklist to the WordPress editor with that in mind.
How to Use the WordPress Editor to Create a Blog Post Checklist
PublishPress Checklists is the simplest method to add a blog post checklist to the WordPress editor. This plugin adds a checklist to the WordPress editor’s right-hand menu.
You may add a list of default tasks to your checklists in PublishPress. For your WordPress blog, it also allows you to build custom checklist tasks.
You must first install and activate the plugin. Please visit our article on how to install a WordPress plugin if you need additional information.
Go to Checklists » Settings after you’ve activated it.
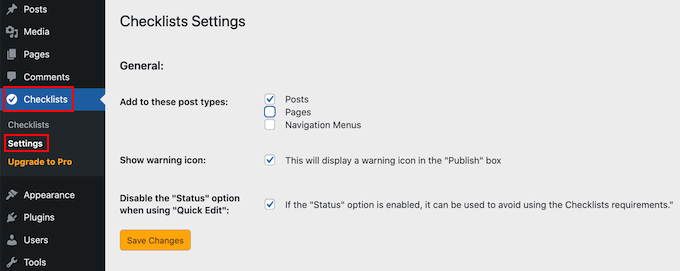
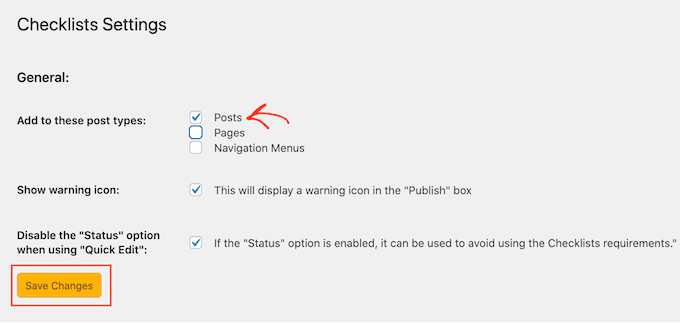
You may choose where your checklist will appear in WordPress here. You’ll want to click the ‘Posts’ option in the WordPress editor to add a blog checklist.
After that, click the ‘Save Changes’ button to save your changes.
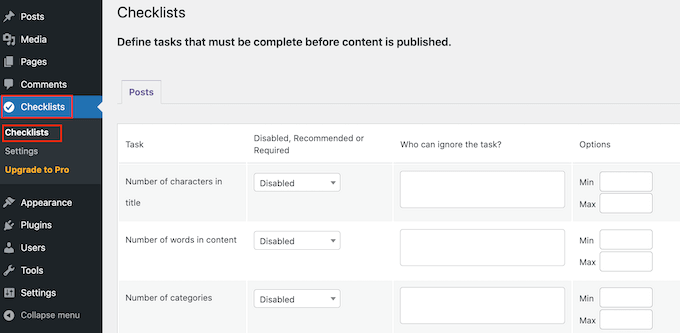
After that, click to Checklists > Checklists to create your checklist.
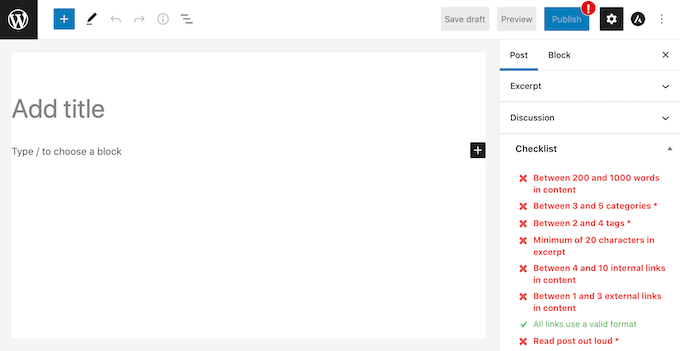
All of the default tasks that you may add to your blog post checklist can be found here. When these tasks are accomplished, PublishPress may recognise them and tick them off for you.
By default, all of these tasks are deactivated.
Simply use the ‘Disabled, Recommended, or Required’ dropdown option to add an item to your blog post checklist.
You now have the option of selecting ‘Required’ or ‘Recommended.’
If you choose ‘Required,’ authors will be unable to publish their blog post until they have completed this activity.
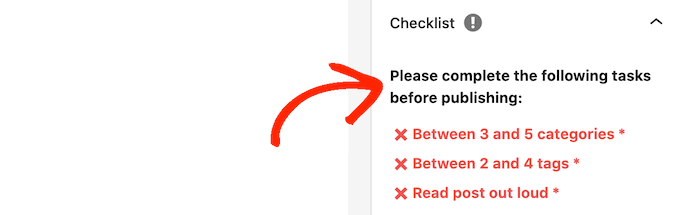
If a user presses the ‘Publish’ button before completing all of the ‘Required’ actions, WordPress will display a notice that says, ‘Please complete the following tasks before publishing.’
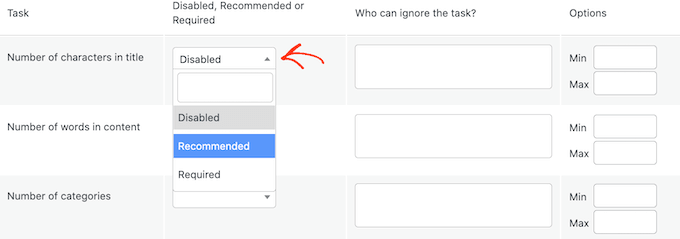
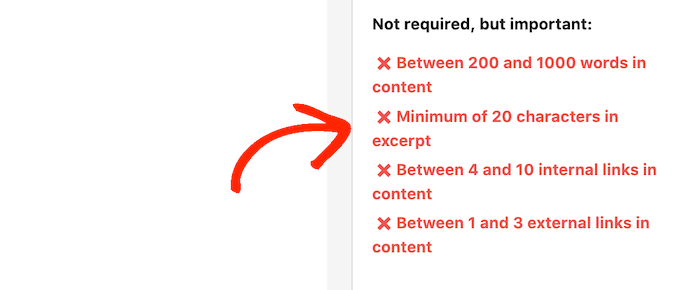
Instead, if you choose ‘Recommended,’ the editor will display a notice asking writers to finish any remaining ‘Recommended’ activities before publishing.
Authors will, however, be allowed to submit their articles without completing these duties.
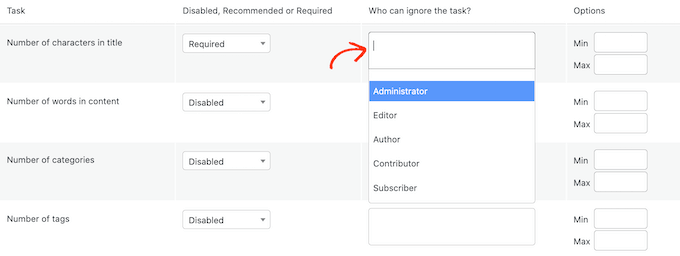
You can continue on to ‘Who can neglect the task?’ after choosing between ‘Recommended’ and ‘Required.’
Even though the job is ‘Required,’ you can allow specific user roles to publish a post without finishing it. For example, you may trust your site’s administrators or editors to skip this step if they believe it is in the best interests of the site.
Click the ‘Who can ignore the task?’ box to add a user role to your ‘ignore’ list.
This brings up a dropdown menu with all of your site’s different user roles.
You may now add users to your ‘ignore’ list by simply clicking on their role.
This brings up a dropdown menu with all of your site’s different user roles.
You may now add users to your ‘ignore’ list by simply clicking on their role.

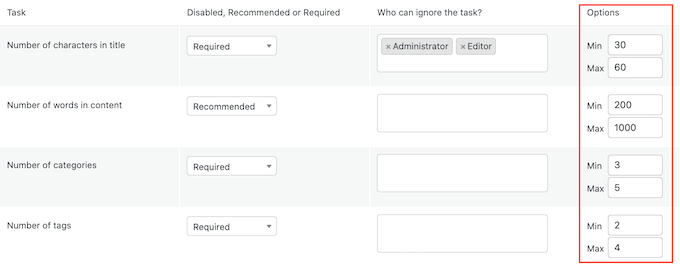
You may need to define a maximum and minimum value for specific jobs. You can, for example, require authors to include a certain number of categories in their posts. Please visit our article on how to add categories and subcategories in WordPress for more information.
You can enter in the numbers you wish to use if the job contains a ‘Min’ and ‘Max’ section.
Simply repeat the technique mentioned above to add more things to your checklist.
Custom tasks can also be added to your blog post checklist.
The disadvantage is that PublishPress has no way of knowing whether or not the author has finished custom tasks. As a result, the author will have to do this check manually.
Please visit our tutorial on how to optimise your blog posts for SEO like a pro for additional information on custom tasks you might wish to add.
To make a custom task, go to the bottom of the screen and select ‘Add custom task.’
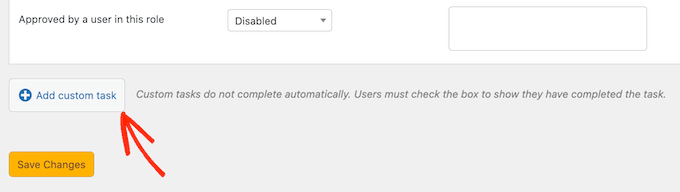
This creates a new task that you may modify.
To begin, fill in the ‘Enter name of custom task’ area with the task’s name. This text will appear in your checklist, so make sure it explains all the writers need to know.
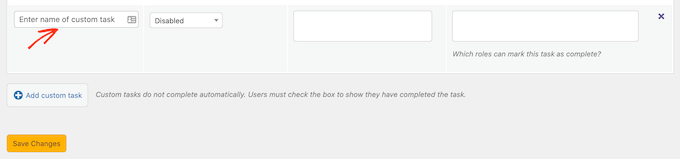
By following the steps outlined above, you may now make this assignment ‘Recommended’ or ‘Required,’ and provide certain people the choice to disregard it.
You may define the people who can mark a job as complete for custom tasks. Custom tasks, for example, might be used to construct a separate ‘Editing’ checklist for users with the Editor job.

To do so, go to the ‘Which roles may mark this work as complete’ box and check the box. This brings up a dropdown menu where you may choose any of your user roles.
Click the ‘Save Changes’ button once you’ve completed all of the things on your checklist. You can now view your blog post checklist in the WordPress editor.
We hope this post taught you how to use the WordPress editor to create a blog checklist. You might also be interested in our guide to creating an email newsletter and our expert choice of the top WordPress SEO plugins and tools for improving your rankings.